11. Advanced rigging.
Now we have got to grips with the basics I'm going to take you through the more complicated method of setting up the tank.
The sage engine renders geometry by giving each object it's own "chunk" or draw call. So it takes about the same processing power to render an object weighing 100 polys as an object weighing 1000.
It is the number of draw calls that have an effect on performance; the key is to have as few objects as possible. It's best to have fewer more detailed meshes than more low detail meshes. Just watch out for the vertex count; try not to let that go higher than it really has to for the object. Some Generals objects ended up with loads of separate meshes and massive overall vertex counts, what you should aim for is something like 10 meshes or less. The predator is made of 9 meshes, each object being it's own bone. The Mammoth on the other hand is set up differently. Using the same method as the predator, it would have too many chunks, so they've made the body all one object and used the WWskin to allow bones to control turret and barrel movement.
This is what I'm going to take you through now.
Going back to the tank model in 3DS Max, select the chassis, turret and gun barrel and hide everything else.

Create a bone, name it Bone_Turret. Click the Align tool button and click on the turret mesh.

What this will do is align the pivot of the bone you have created with the pivot of the turret mesh we positioned earlier on in the basic rigging. Make sure X, Y and Z positions are checked and that both current and target are set on pivot points, click ok.
Create bones for the barrel and chassis and align them. Now link the bones in their own hierarchy (not to any meshes).

Select you chassis mesh and attach your turret and barrel meshes to it to form one object.

Go to the Create tab on the right toolbar, click the Space Warps button and select Westwood Space Warps from the dropdown list. Click WWskin and create one anywhere in your scene. It will show in all viewports as a very small wireframe crossbones.

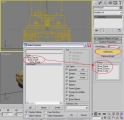
With the WWskin selected, goto the modify tab and click on Add Bones. Drag-select your bones from the list and click ok. They will appear in the bones box on the modify panel.

Now click the Bind to Space Warp button on the top toolbar and drag a line from the WWskin to the tank mesh. Just like for a hierarchical link, the tank mesh will flash.

Now selet the tank mesh. The first thing you will notice is all the vertices are now showing. Here's where we link them to the bones. It's a good idea to save often during this bit as it can be unstable.

Select all the vertices for the chassis only (not the turret or barrel vertices). Click the Link to Bone button and click on the chassis bone. You will hear the windows error sound, DO NOT PANIC! If you don't see an error message, it hasn't crashed. It's a very poor choice of sound to play to indicate a successful link, probably the devs showing some humor.
Now select the vertices for the turret only and link them to the turret bone. Do the same for the barrel.

Wondering how to de-select your mesh? Well, you're not permanently stuck. Click the + next to WWskin Binding and de-highlight Vertices or more easily you could just hit H on your keyboard and select another object.
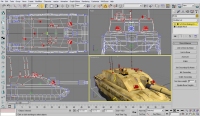
Now that your vertices are linked to bones, you should test them. Select the turret mesh and click the Auto Key animation button. Move the animation slider forward a few frames and rotate the Turret bone. You should see the barrel bone turn with it, aswell as the turret and barrel parts of the tank mesh. Now elevate the barrel bone (ensure the reference coordinate system is set to local), you should see just the barrel part of the tank mesh raise with it.

Excellent! It works! Remember to de-select the Auto Key animation button and delete the keys for the turret and barrel bones.
Unhide everything else. The treads and Pickbox will now need to be Hierarchically linked to the chassis bone, the muzzleflash linked to the Barrel bone. The main tank body and WWskin don't need to be linked to anything. Remember to uncheck Export Geometry in the W3D Tools export settings for your bones and that's it! You're ready to export again!

